***See centerpoint-time-clock-supervisors.htm instead.
CenterPoint Payroll®
- Using CenterPoint Time Clock for Supervisors
Related Help

This document contains detailed information for employees who will use the time clock as a supervisor, for example for approving time and time off requests. The information in this document can be used if your Employee Code is entered as a Supervisor in CenterPoint Payroll in Setup > Employees > Employment tab. Follow the Using CenterPoint Time Clock for Employees document to register and use CenterPoint Time Clock as a Supervisor.
View and Approve Employee Activity
View an Employee Summary and Approve All Employee Time
View/Approve Employee Time Off Requests
Log In
- From a web browser, enter https://timeclock.redwingsoftware.com.
- Click Log In, enter your Email and Password, and then click Log In.
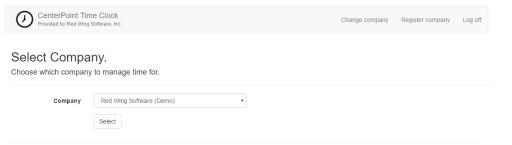
- If you supervise employees for different companies, select the company you want to manage time for and then click Select.
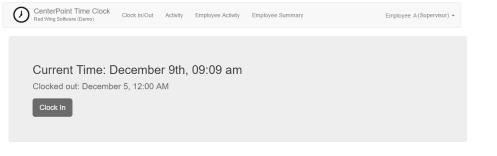
- Once you are logged in, your name (Supervisor) will display in the upper-right portion of the screen. In the following example Employee A is a Supervisor.
Reset your Password
If you have forgotten your password and would like to reset the password, follow the steps below:
- From a web browser, enter https://timeclock.redwingsoftware.com.
- Click Log In.
- Select the Forgot your password? link.
- Enter your Email address.
- Click Email Link.
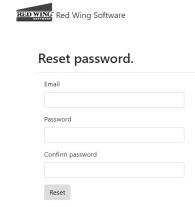
- An email will be sent to your current email address from Red Wing Software. Open the Reset Password email and click the here link.
Note: If the email is not received, please look in your Junk email folder.
-
Enter your Email address, your new Password, and then enter your new password again in the Confirm password box, and then click Reset.
Changing your Password
If you know your current password and would like to change the password, follow the steps below:
- From a web browser, enter https://timeclock.redwingsoftware.com.
- Click Log In.
- Enter your Email and Password and click Log In.
- In the upper-right corner, click the down-arrow next to your name, and then select View Account.
- Click Change Password.
- An email will be sent to your current email address. Open the Red Wing Software Change Password email and click the here link. Enter your Current Password, New Password, and Confirm New Password, and then click Update Password.
View and Approve Employee Activity
- Log into CenterPoint Time Clock.
- Select Employees > Employee Activity.
- Select the Employee you want to review/approve time cards for.
- Select the From/To dates to display time cards in a date range.
- Click Go.

- Click Add to add additional time entries, for example, you may want to add an entry for overtime.
- To correct time entries or clocked entries, click the
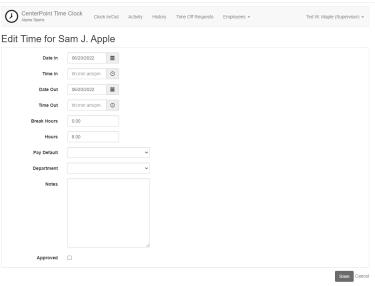
 Edit button next to the entry that needs to be modified and the Edit Time screen will display where you can make your changes or approve the individual time entry by selecting the Approve check box. Click Save when the entry is accurate. If a note has been entered on the time card, the note button will display. Click the
  button to display the note.
- An entry can be removed by selecting the corresponding
 Trash Can button.
 - An Audit Log can be viewed by clicking
 .
. - Click Employee Summary to quickly move back and forth between the Employee Activity and Employee Summary pages filtered for the same dates.
- Once all the entries displayed are accurate, click Approve to approve the entries all at once (if you did not approve them from the Edit Time screen), or click Approve + Next to approve all entries for the current employee and automatically move to the next employee.
View an Employee Summary and Approve All Employee Time Cards
- Log into CenterPoint Time Clock.
- Select Employees > Employee Summary .
- Select the From/To dates to display time cards in a date range.
- Click Go.
- The Employee Summary screen will display each employee and the total number of hours, the approval status, and the date approved. Click the employee's name to drill-down to the Employee Activity screen to see details for the selected employee.
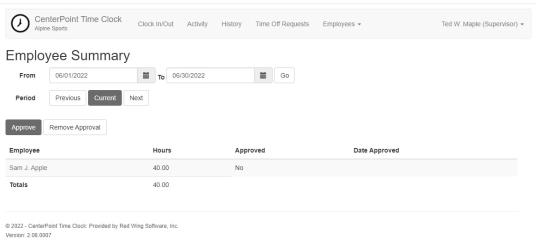
- Click Approve to approve all time entries in the specified date range or click Remove Approval to remove the approved status for all time entries in the specified date range.
View/Approve Employee Time Off Requests
- Log into CenterPoint Time Clock.
- Select Employees > Employee Time Off Requests.

- Use the Employee, Type, Status and From/To Dates to filter for the type of request(s) you want to view within a specific date range.
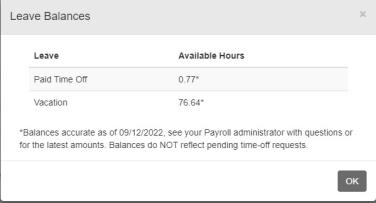
-
Click Leave Balances to view the Leave and Available Hours as of the last accrual (the Available Hours do not include pending time off requests).
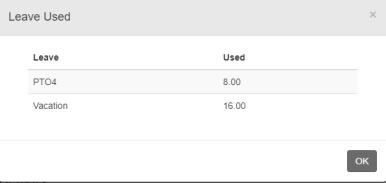
-
Click Leave Used to display all the leave pay defaults for an employee and any hours for pending time off requests. A pending time off request is an approved request that has not yet been imported into CenterPoint Payroll.
- To approve an employee's time off request, click
 . If you want to include a comment when you approve the time off request, enter the comment in the Approve Request Comments screen and then click OK. To deny a request, click
  . If you want to include a comment when you deny the time off request, enter the comment in the Deny Request Comments screen and then click OK. The requesting employee will receive notification regarding the approval or denial. To view notes from the employee or comments entered upon approval or denial of a time off request, click
  .
.
View/Change Employee Status
- Log into CenterPoint Time Clock.
- Select Employees > Employee Status .
- The Employee Status screen will display all employees the supervisor is responsible for and their current status/detail: In, Out, or on Leave. To display a specific status, change the filter from All to another status. From this screen you can also:
-
Clock In/Out or Add Time for a Group of Employees - Select the employees and then click
 to clock out, click
  to clock in, or click
  to add time.
 - Clock In/Out or Add Time for an Employee - Select the employee and then click
 to clock out, click
  to clock in, or click
  to add time.
 -
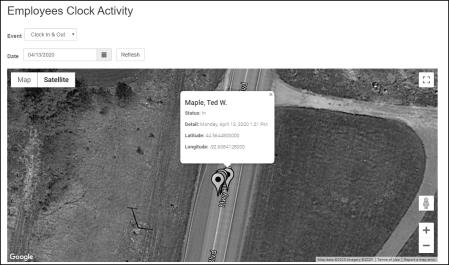
Map Clock In/Out Locations for a Group of Employees - Select the employees click
 , select the Event: Clock In & Out, Clock In, or Clock Out, select the Date, and then click Refresh. The Map or Satellite image displays pinpoints for clocked in entries in green and clocked out entries in red. Click on a pinpoint to display the employee name, clock in/out status, date details, and longitude and latitude information. Click OK to close the map.
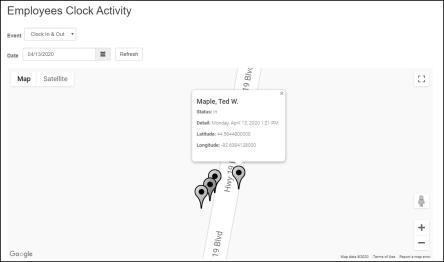
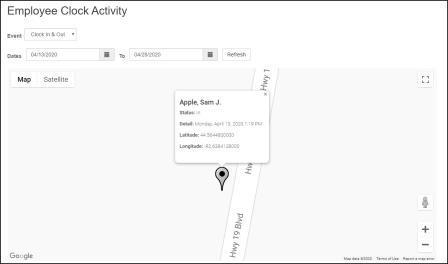
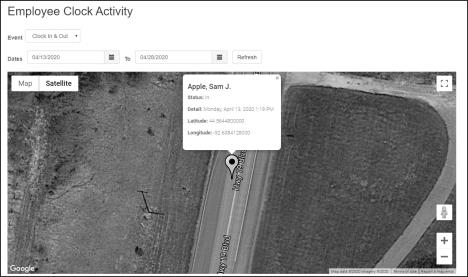
- Map Clock In/Out Locations for an Employee - Select the employee, click
, select the Event type, select the Date Range, and then click Refresh. Click OK to close the map. The Map or Satellite image displays pinpoints for clocked in entries in green and clocked out entries in red. Click on a pinpoint to display the employee name, clock in/out status, date details, and longitude and latitude information. Click OK to close the map.
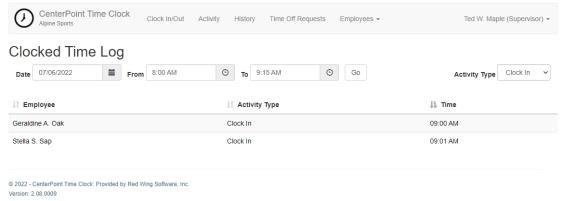
View the Clocked Time Log
This option allows you to quickly view a log of clocked in/out times for all employees for any selected date or time.
- Log into CenterPoint Time Clock.
- Select Employees > Clocked Time Log.
- Select the Date and From/To times you want to view the log for. From/To times can be blank to see the whole day's activity.
- Select the Activity Type you want to view: All, Clocked In, or Clocked Out.
- Click Go.
View Employee History
The following selection allows supervisors to look up time cards for their employees which have already been imported into CenterPoint.
- Log into CenterPoint Time Clock.
- Select Employees > Employee History.
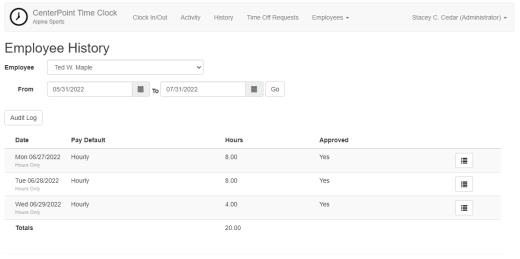
- Click Audit Log or
 to view an audit of time clock entries.
![]()
For Supervisors and Administrators
Change Employee Format
- Log into CenterPoint Time Clock.
- Click the down-arrow next to your name on the upper-right side of the screen.
- Select Settings.
- Click Change next to Employee Format.
![]()
- Select one of the other Employee Format options:
- Last, First
- First, Last
- First, Last (Code)
- Last, First (Code)
- (Code) First, Last
- (Code) Last, First
- Click Change Employee Format.
Set Alternate Supervisor
When an alternate supervisor is set all supervisor duties are switched to the alternate. The alternate supervisor can see activity and approve time/requests for the employees managed by the user. Note: The main supervisor will still have access to their employees' time clock data, but time off request notifications will go to the alternate supervisor.
- Log into CenterPoint Time Clock.
- Click the down-arrow next to your name on the upper-right side of the screen.
- Select Settings.
- Click Change next to the current alternate supervisor setting.
- If the setting is inactive, change the Off toggle to On.
- In the Supervisor box, select the supervisor that will approve time cards and cover for the main supervisor in their absence.
- Enter the From/To dates the alternate supervisor is active. The alternate supervisor will automatically inactivate after the To date.
- Click Apply.
Note: Administrators can also set an alternate supervisor for a supervisor from the Name (Administrator) > Manage Supervisors menu.
For Administrators
Receive Administrator Notifications
This option can be set to eliminate unwanted email notifications for administrators who are not involved in the time off request approval process.
- Log into CenterPoint Time Clock.
- Click the down-arrow next to your name on the upper-right side of the screen.
- Select Settings.
- Click Change next to the current Receive Administrator Notification setting.
- If you are an administrator that is not involved in the time off request process, change the toggle selection to No.
- Click Update.
Entry Date Restriction
This option prevents employees from entering time after payroll is completed for a pay period so time entries aren't missed during import and pay run processing.
- Log into CenterPoint Time Clock.
- Click the down-arrow next to your name on the upper-right side of the screen.
- Select Settings.
- Click change next to the Entry Date Restriction setting.
- Change the Enabled toggle to On.
- Enter the Date that employees are restricted from entering time before.
- In the Action box, if you want ot be notified when entries are entered prior to the Date selection, select Notify Administrators of time entries prior to this date or to restrict time from being entered or edited, select Prevent time entries prior to this date.
- Select Apply.
Frequently Asked Questions
Q: I have setup items (Employees, Pay defaults, departments, etc.) in CenterPoint Payroll that are not the same as those listed on the CenterPoint Time Clock. How can I make the website match my CenterPoint Payroll setup?
A: Perform a manual synchronization in CenterPoint Payroll by following the steps below:
- Select Setup > Payroll Details > Time Clock Settings.
- On the General tab, click Synchronize.
- Click OK.
|
Document: 3333 |
|---|